
Chin-Ups: How To, Muscles Worked & Common Mistakes
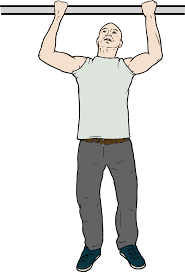
Chin-ups are one of the best compound exercises you can do for building both your back and your biceps simultaneously — and unlike most biceps exercises, they let you work with your full bodyweight, making them one of the most effective mass builders for the upper body. The underhand grip is what makes chin-ups special: it puts your biceps in a mechanically strong position throughout the entire movement, giving them far more work than pull-ups do.
If you want bigger biceps and a stronger back at the same time, chin-ups are one of the most efficient exercises in existence.
Chin-Ups vs. Pull-Ups
These two exercises look almost identical but the grip changes everything:
- Chin-ups — underhand grip (palms facing you), shoulder-width or slightly narrower, much greater biceps involvement, many people find them slightly easier
- Pull-ups — overhand grip (palms facing away), wider grip, greater lat and upper back emphasis, less biceps involvement
Both are excellent exercises and complement each other perfectly. The chin-up lives in the biceps section because of the significant biceps work it provides — but it’s equally at home on back day. Check out our Pull-Ups page for the overhand variation.
Muscles Worked
Primary muscles:
- Biceps brachii — far more heavily involved than in pull-ups due to the supinated underhand grip, making chin-ups one of the best compound bicep exercises
- Latissimus dorsi — the large back muscle that drives the pulling motion, worked hard throughout
Secondary muscles:
- Teres major — assists the lats throughout the pull
- Rhomboids — squeezed together at the top of each rep
- Trapezius (mid and lower) — stabilizes and retracts the shoulder blades
- Rear deltoids — assist throughout the pull
- Core — works continuously to keep your body stable and prevent swinging
How to Perform Chin-Ups
- Grab a pull-up bar with an underhand grip (palms facing toward you), hands roughly shoulder-width apart or slightly narrower.
- Hang at full arm extension — a dead hang. Let your shoulder blades spread and your lats stretch at the bottom.
- Before pulling, depress your shoulder blades — pull them down and back slightly to pre-engage your lats and protect your shoulders.
- Pull yourself upward by driving your elbows down toward your hips, keeping them relatively close to your body throughout.
- Continue pulling until your chin clears the bar — or ideally until your upper chest reaches bar height for a deeper contraction.
- Lower yourself slowly and under complete control back to the dead hang position, fully extending your arms at the bottom.
- Repeat for your desired reps.
Pro tip: Think about pulling your elbows toward your hips rather than pulling your hands toward your shoulders. This cue activates both your lats and your biceps simultaneously and stops you from turning the movement into a pure arms exercise.
Sets & Reps
| Level | Sets | Reps | Rest |
|---|---|---|---|
| Beginner | 2–3 | 1–5 | 2 min |
| Intermediate | 3–4 | 6–10 | 90 sec |
| Advanced | 4–5 | 12–15+ | 60 sec |
Can’t do a chin-up yet? The progressions section below will get you there.
Common Mistakes to Avoid
1. Not starting from a dead hang Every rep should start from full arm extension. Shortening the range of motion at the bottom reduces the lat stretch and bicep loading that makes chin-ups so effective. Always start from a full dead hang.
2. Grip too wide Unlike pull-ups where a wider grip is common, chin-ups work best at shoulder-width or slightly narrower. Going too wide with an underhand grip puts your wrists in an awkward, rotated position that causes discomfort and reduces the mechanical advantage of the biceps.
3. Swinging your body Using momentum to swing yourself up takes the work away from your back and biceps. Keep your body as still as possible — if you’re swinging, slow down or reduce the reps per set.
4. Not going high enough Getting your chin barely over the bar is the minimum — but pulling until your upper chest reaches the bar gives you a much stronger lat and bicep contraction at the top. Pull as high as you comfortably can.
5. Dropping too fast The slow lowering phase is where a lot of the muscle building happens — especially for the biceps which are eccentrically loaded throughout the descent. Lower yourself over 2–3 seconds every rep for maximum development.
Progressions for Beginners
Can’t do a chin-up yet? Here’s how to build up:
- Dead hangs — hang from the bar for time to build grip and shoulder stability
- Scapular pulls — from a dead hang, retract and depress your shoulder blades without bending your elbows. Builds the initial pulling strength
- Resistance band assisted chin-ups — loop a band around the bar and under your knees to reduce the load
- Assisted chin-up machine — counterweighted machine lets you practice the full movement with less than full bodyweight
- Negative chin-ups — jump or step to the top position and lower yourself as slowly as possible. Extremely effective for building chin-up strength quickly
Making Chin-Ups Harder
Once bodyweight chin-ups feel manageable, here’s how to keep progressing:
- Weighted chin-ups — add a weight plate using a dip belt or hold a dumbbell between your feet
- Slow negatives — take 5–10 seconds to lower yourself on every rep for intense eccentric loading
- L-sit chin-ups — legs held out straight in front throughout, massively increases core demand
Where Chin-Ups Fit in Your Workout
Chin-ups are a compound movement and can fit comfortably on both back day and biceps day. On back day they complement pull-ups and rowing movements perfectly. On arm day they serve as a powerful compound opener before isolation curls — your biceps will already be pre-loaded from the chin-ups which makes every subsequent isolation exercise more effective. Either way, do them early in the session when you’re fresh.