

Handstand push-ups: How To, Muscles Worked & Progressions
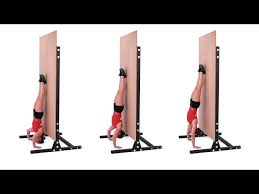
Handstand push-ups are one of the most impressive and demanding bodyweight exercises you can do. They’re essentially an overhead press using your entire bodyweight — which means serious shoulder, tricep, and upper chest development with zero equipment needed beyond a wall and a floor.
They’re also one of those exercises that looks intimidating but is very achievable with the right progression. If you’re not there yet, this page will show you exactly how to build up to them step by step.
Handstand Push-Ups – Muscles Worked
Handstand push-ups are a compound pressing movement that works multiple muscles simultaneously:
Primary muscles:
- Anterior deltoid — the front of your shoulder does the bulk of the pressing work
- Lateral deltoid — heavily involved throughout the press
- Triceps brachii — powerfully engaged to extend the arms on every rep
Secondary muscles:
- Upper pectoralis major — the upper chest assists throughout
- Trapezius — works hard to stabilize the shoulder blades overhead
- Serratus anterior — stabilizes the shoulder blades throughout
- Core and glutes — work continuously to keep your body rigid and prevent your hips from sagging or piking
How to Perform Handstand Push-Ups (Wall-Assisted)
The wall-assisted version is the standard starting point for most people and what we’ll cover here:
- Place a mat or folded towel against the wall to protect your head and wrists.
- Face away from the wall, place your hands about shoulder-width apart on the floor, roughly 15–20cm from the wall.
- Kick your feet up onto the wall and walk them up until your body is as straight as possible — hips over shoulders, shoulders over hands.
- Brace your core and squeeze your glutes to keep your body as straight and rigid as possible.
- Slowly lower yourself by bending your elbows, keeping them at roughly a 45-degree angle from your body — not flaring straight out.
- Lower until your head lightly touches the mat on the floor.
- Press through your palms and push back up to the starting position, fully extending your arms.
- Repeat for your desired reps.
Pro tip: The closer your hands are to the wall, the more vertical your body and the more shoulder-dominant the exercise becomes. Hands further from the wall creates more of an angled press with greater upper chest involvement. Start with hands close to the wall for the most direct shoulder stimulus.
Handstand Push-Ups – Sets & Reps
| Level | Sets | Reps | Rest |
|---|---|---|---|
| Beginner | 2–3 | 1–5 | 2 min |
| Intermediate | 3–4 | 5–10 | 90 sec |
| Advanced | 4–5 | 10–15+ | 60–90 sec |
Handstand push-ups are neurologically demanding so rest periods can be longer than typical isolation exercises. Quality over quantity every time.
Handstand Push-Ups – Common Mistakes to Avoid
1. Flaring elbows straight out to the sides Wide elbows puts your shoulder joints in a vulnerable position and reduces pressing power. Keep your elbows at roughly 45 degrees from your torso — the same principle as a barbell overhead press.
2. Piking at the hips Letting your hips sag back creates an arch that takes the load off your shoulders and makes the exercise easier but less effective. Brace your core and glutes to keep your body as straight as possible throughout.
3. Looking down at the floor Your head should be neutral — looking slightly forward rather than straight down at your hands. Looking too far down puts unnecessary strain on your neck.
4. Hands too wide Going wider than shoulder width reduces your pressing strength and range of motion. Shoulder-width or very slightly wider is the sweet spot for most people.
5. Rushing the lowering phase Dropping quickly to the floor removes the eccentric stimulus entirely. Lower slowly and under control — 2 to 3 seconds down — for maximum shoulder development.
6. Skipping the progression steps Handstand push-ups require significant shoulder strength, balance, and body awareness. Jumping straight to them without building up through progressions is the fastest way to get injured or frustrated. Follow the progression below.
Progressions: Building Up to Handstand Push-Ups
If you can’t do a full handstand push-up yet, here’s the step-by-step progression:
Step 1 — Pike push-ups Start in a downward dog position with hips high and legs straight. Bend your elbows to lower your head toward the floor, then press back up. This teaches the movement pattern with a fraction of your bodyweight.
Step 2 — Elevated pike push-ups Place your feet on a bench or box to increase the angle and load more of your weight onto your shoulders. The higher the surface, the harder it gets.
Step 3 — Wall handstand hold Practice simply holding a handstand against the wall without any push-ups. Build up to holding for 30–60 seconds comfortably. This develops the shoulder stability and wrist strength needed for reps.
Step 4 — Negative handstand push-ups Kick up into a handstand and lower yourself as slowly as possible to the floor. Don’t worry about pressing back up yet — just focus on a controlled descent. This builds the specific strength needed for the movement.
Step 5 — Partial range handstand push-ups From your handstand, lower yourself halfway and press back up. Gradually increase the range of motion over weeks until you can touch your head to the floor.
Step 6 — Full handstand push-ups Full range of motion — head touches the floor, press all the way back to full arm extension. You made it! 🎉
Where Handstand Push-Ups Fit in Your Workout
Handstand push-ups are a compound pressing movement and belong early in your shoulder or push session when you’re freshest — before any isolation work like lateral raises or front raises. Because of the balance and stabilization demand, they require full concentration and coordination, so never do them when fatigued.
They pair especially well after barbell shoulder press work as a bodyweight finisher, or they can replace pressing altogether on a bodyweight-focused training day.